Welding Points
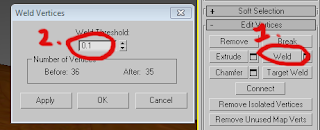
After all the lines had been created, I had to weld all the points. This was a case of going into the modifier tool, choosing vertex. Selecting 2 points that needed to be connected, moving them together and choosing the "Weld Option", there were allot of weld settings to choose from and problems that occurred.
1. By selecting the weld option, a box appears.
2. You are then given a "Weld Threshold", this basically means the higher the value the further away the points and how many points close that point will weld.
It took some playing with but you had to select a value that was high enough to connect all the vertex's, I had heard of problems of people finding that it had not welded correctly when trying to manipulate the points. So i went around and tugged on most of the points to ensure that they were successfully joined and would not make any holes.
Converting to Editable Polygon
Once everything had been welded, I simply right clicked on the shape and clicked "convert to editable polygon", which then essentially went round and filled the lines creating one big shape. But with all the points still attached so that it can be moved and bended to create a 3D face.
As you can see at the moment there is no 3D elements to the face, just simply a flat plane that is now editable. I will now move onto the next stage where I will need to pull all the points of the face outwards from the side view and using the side picture as a reference This will then start making the face 3Demionsional.
The Amazing Blog of Daniel Reeve
The blog that you see before you is an online thinking place for all my University Work. Before you laugh most of it contains 3D work, which I would not call my best area of expertise!! I am a 2D Illustrator at heart but love to try out new stuff and see what else I can create.
My personal website DJR DESIGNS is in the navigation bar at the top, if you want to see some of my best work and designs. If not then carry on reading and discover how an amateur 3D designer works :D
My personal website DJR DESIGNS is in the navigation bar at the top, if you want to see some of my best work and designs. If not then carry on reading and discover how an amateur 3D designer works :D
Archives
-
▼
2009
(25)
-
▼
October
(21)
- Final Finished Head
- Experimenting with lighting
- Setting up The Stage
- Attempt 2 of Adding Hair
- BMP Map
- Ear Texture, UVW MAPPING???
- Using 3D Studio Max 10!!
- UVW Mapping
- Lets get Hairy!!!
- Video of the Head
- Adding CREEEPY Eyes
- Making the Ear...
- Creating the Back of the Head
- Creating the Mouth
- Creating the Nose
- Forgetting to BLOG!!
- Symmetry
- Phantom of the Opera!!
- Flat Mask
- Line UP!!!!!
- 3D Studio Max Plates
-
▼
October
(21)


0 comments