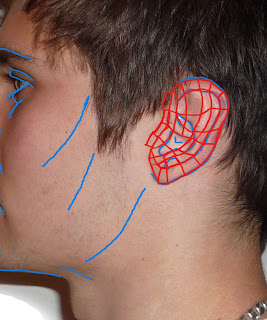
As I have mentioned I believed that the ear would be really hard to do and give me allot of problems. It did cause me some issues but not as bad as i thought....
Typology of the Ear
First as like before with the face, I needed to make the typography for the ear (As shown above) following the bone and skin structure of the ear. It was not that tricky to do as It was such a small area to cover compared to the face.
I watched the tutorial and saw how he created his ear, I then followed the same technique. I spent a good time on this as alike the face, if I messed this up then it would make the ear harder to model down the line. So this part is CRUCIAL!!
Creating an Editable Poly
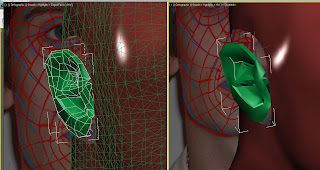
Its the same process as making the "mask", simply creating all the lines over the topology then welding them together and converting them to an editable poly.
Once the editable poly is made you can then move the vertexes (as like with the face) in the front and side view to the appropriate distance from the face.
Attaching the Ear
It was really tricky to manipulate the ear, due to its complexity and angles near the head. I had to keep moving and rotating the perspective to see it from all angles, to get the desired look. It was also quite tricky as I just rather boney ears so there are allot of curves, divots and bulges.
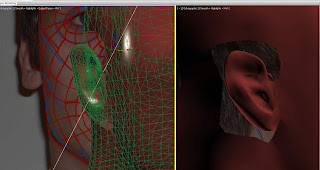
Welding the ear to the Head
When watching the video tutorial, he made it look very simple to do. Needless to say it was not!!
I started off by deleting an area from the head by selecting the faces, enough to accommodate the ear. Then selecting the head and clicking the attach button, then clicking the ear to attach it. This didn't actually attach it but it made it part of the head, which meant I could see points from both the ear and the head so they could be lined up.
I then moved the ear over and staring welding the points to the head.
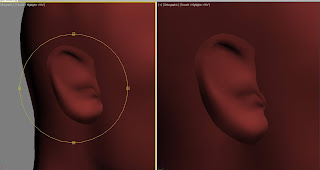
It has created a little bit of a ridge when attached to the ear, it is an not as smooth as i would like it but luckily for me i have side burns which will cover where the ear meets the head. So you wont see that connection line.
Overall the ear has been quite a dissatisfying task, 3D is not my strongest skill because it easily frustrates me and working on an object that small and complex was really rather challenging.
I found it hard to move around the object but found a new keyboard shortcut of holding alt + using the scroll will to quickly pan round the object. ( A shortcut that most people probably know but I myself was unaware of.)
Now that the ear is connected, all the modeling is pretty much completed. I will now be moving onto the texture mapping.
The Amazing Blog of Daniel Reeve
The blog that you see before you is an online thinking place for all my University Work. Before you laugh most of it contains 3D work, which I would not call my best area of expertise!! I am a 2D Illustrator at heart but love to try out new stuff and see what else I can create.
My personal website DJR DESIGNS is in the navigation bar at the top, if you want to see some of my best work and designs. If not then carry on reading and discover how an amateur 3D designer works :D
My personal website DJR DESIGNS is in the navigation bar at the top, if you want to see some of my best work and designs. If not then carry on reading and discover how an amateur 3D designer works :D
Archives
-
▼
2009
(25)
-
▼
October
(21)
- Final Finished Head
- Experimenting with lighting
- Setting up The Stage
- Attempt 2 of Adding Hair
- BMP Map
- Ear Texture, UVW MAPPING???
- Using 3D Studio Max 10!!
- UVW Mapping
- Lets get Hairy!!!
- Video of the Head
- Adding CREEEPY Eyes
- Making the Ear...
- Creating the Back of the Head
- Creating the Mouth
- Creating the Nose
- Forgetting to BLOG!!
- Symmetry
- Phantom of the Opera!!
- Flat Mask
- Line UP!!!!!
- 3D Studio Max Plates
-
▼
October
(21)


0 comments